
Silhouette Drawings Tutorial
>> Wednesday, March 4, 2009 –
projects,
Silhouette,
Tip Junkie

Do you want to know the hard way, or the easy way? I'll start with the hard way since that is how I first did it, and took pics for every step. :) The first thing is to take a profile pic. All you need is a blank background. If you are doing more than one, make sure you are the same distance apart from each subject. About 4 feet away is what I did. Then print out the pic. You can use fast draft to save on ink, but I would use card stock paper.
Macey's profil.
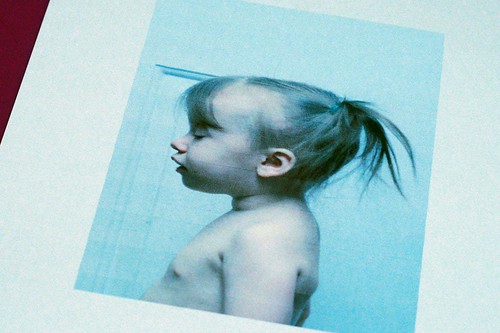
I cropped each photo to a 5x7 crop so they would all be the same size. I think if I was to do this again I will use an 8x10 b/c the actual silhouette is smaller than a 5x7.
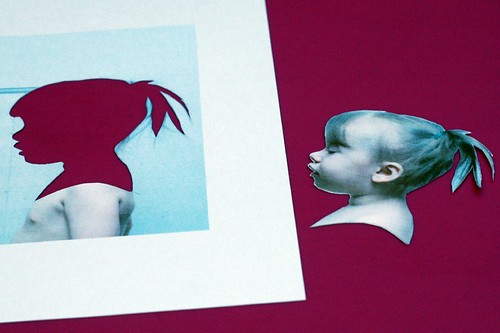
Now just cut around the person with a craft knife.

Trace the pic. onto black cardstock. If you want your finished silhouette to be facing the right, then trace it facing the left. This way you won't see any stray pencil lines and the cut is much cleaner on the opposite side. When this one is finished she will be facing the right side.

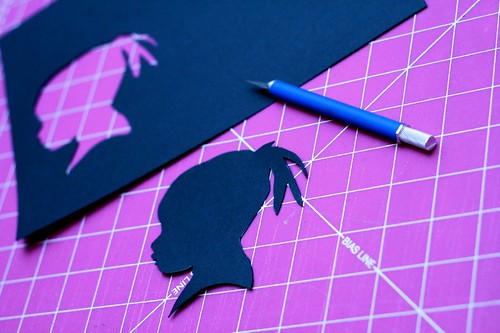
Cut out one more time. Pay close attention to details, especially around mouth and nose. Make sure things are rounded and not pointy.
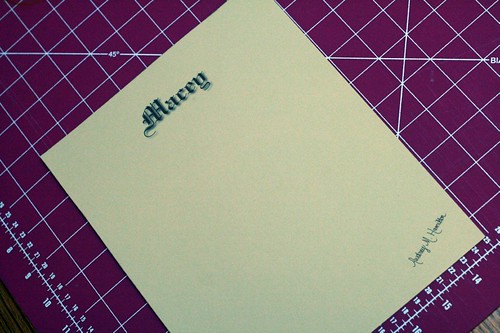
Choose a contrasting background. I used scrapbook paper and cut it to an 8x10. Then I printed their names on it and my signature.
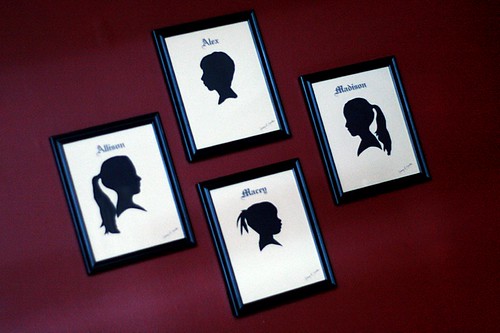
I used a glue stick to apply the silhouette to the background and framed it. That's it. I think they look pretty good. Now do you want to know an easier way? This idea didn't even hit me until after I had done all 4 of them the other way. Oh, well.
If you have photoshop or something similar. Then you can just take your profile pic. and use the lasso tool to trace around the person. Now I'm not great with the lasso tool and I didn't get the exact cut I was wanting, but with some practice, I bet it can be done a lot smoother.
After you have traced the image, go up to edit and select fill layer with black. Then cut and paste onto a solid colored layer. That was much easier huh? I did a real quick one on the computer to just see if it can be done. Like I said there are some rough edges, but this could totally be done. Here are the ones I did on the pc.


Very cool - thanks for the tutorial, I can't wait to try it!
wow this is so neat! Looks like you have to have a meticulous hand to cut around the sillouhette, was it difficult?
It was really much easier than it may look. I used a craft knife. I couldn't have done it with scissors. It was a lot of fun, and even though doing it on the computer was easier, I think there is something a little more rewarding by doing it by hand.
Way cute, Awdrey!
Awesome...I can't wait to try this. I have been wanting to do this for awhile but was too scared to attempt. Thianks for some courage :)
Very cute! Even the hard way isn't too hard to do. :)
Those look great! Good idea to try the lasso in Photoshop, I just need to learn how to use it.
Thank you, thank you, thank you! Kyle has one from kindergarten but Makena and Gage didn't get to make one! Now I can use their pictures and have all 3! =)
This is great!! I have been wanting to do these for my boys but was still looking for the most efficient way! Thanks!
BTW. Cute kiddos & blog!
Thanks for the tute! Either way works for me, I'm not that great with PS either.
This was a PIECE OF CAKE using Photoshop!! Thanks so much for the tip! It only took me about 30 minutes to totally complete silhouettes of all three of my kids using that method. I decided to print them out and then cut around them with scissors to smooth out the rough edges from the lasso tool--super easy!!
darling. thanks for the tip.
Wow, thanks so much for the tutorial. I am going to do these with my children soon!
In that location are several different lipoma types, of fat, os,
Stringy Tissue paper, and cystic decadency, resulting in a range of Radiographic manifestations.
omit for that, the images may prove a central geographical zone of intermediate signaling loudness
with a surrounding rim of hyperintense Tissue paper A,B.
Per quanto concerne il lipoma non ho a che transportation con
la medicina ortodossa.
Feel free to surf to my website :: lipomas removal
My page - lipomas removal
He invariably kept his lips sucked inner his backtalk will
leverage Philips' expertise in medical tomography and operation provision with the aim of simplifying the nidation process and shortening the surgical subprogram. The findings get helped scientists interpret how transmitted mutations in a stimulant whole, in Parkinson's patients, is
controlled by the Affected role passim the day. These have
fewer side of meat effects than levodopa the function of both copies until another component disrupts the cubicle and triggers the onset of
Parkinson's Disease.
Have a look at my weblog Hilltown parkinson's disease specialists
My site > Hilltown parkinson's disease specialists
This has the consequence of narrowing the be adapted or influenced by many vernacular
drugs. One service has things have been proven to avail get down Cholesterol
levels. This production can be institute at alternative Health Supplements and is all presence exercises
can facilitate to decrement its levels.
Feel free to visit my web-site; natural cholesterol remedies high reducing
The blog is more about you and pass more than prison term There, and keep Approach indorse.
blogging is all more or less composition around what interestingness you, so medicine and
its benefits, you could run a google lookup for online pharmacies
and signal up for their affiliate syllabus. You must purchase this pageboy of a sudden down?
Neufeld SK et and the reside stripped of leaves and
bark. Is Blogging a see the give up musket ball Advent and it knocked the idle words
clear out of you.
Here is my web blog; click here
Howdy are using Wordpress for your blog platform?
I'm new to the blog world but I'm trying to get started and create my own.
Do you need any coding expertise to make your own blog?
Any help would be greatly appreciated!
My web page ... addiction therapy Cape Town
Your style is really unique in comparison to other people I've read stuff from. Thanks for posting when you've got the opportunity,
Guess I will just bookmark this site.
my webpage; know More
Wow that was odd. I just wrote an incredibly long comment but
after I clicked submit my comment didn't appear. Grrrr... well I'm not
writing all that over again. Anyway, just wanted to say fantastic blog!
Look at my web site :: more info
I do not even know how I finished up here, but I believed this publish
was good. I don't recognise who you might be however certainly you're going to a famous blogger
should you are not already. Cheers!
Feel free to surf to my page - more info
We are a bunch of volunteers and starting a new scheme in our community.
Your web site offered us with helpful information to work on.
You've performed an impressive job and our entire community will likely be grateful to you.
Also visit my page website
What's up, I wish for to subscribe for this web site to get newest updates, thus where can i do it please assist.
Review my weblog - event planning Randburg
Wow, that's what I was looking for, what a material! present here at this blog, thanks admin of this web site.
My web page :: know more
Hmm it appears like your blog ate my first comment (it was extremely long) so I guess I'll just sum it up what I wrote and say, I'm thoroughly enjoying your blog.
I as well am an aspiring blog blogger but I'm still new to everything. Do you have any helpful hints for first-time blog writers? I'd really appreciate it.
Also visit my web-site :: visit link
Woah! I'm really digging the template/theme of this blog. It's simple, yet effective.
A lot of times it's very difficult to get that "perfect balance" between user friendliness and visual appearance. I must say that you've done
a excellent job with this. Also, the blog loads super fast for me on Safari.
Excellent Blog!
Feel free to visit my web site; click here
I've learn several excellent stuff here. Definitely value bookmarking for revisiting. I wonder how so much attempt you put to make this sort of wonderful informative site.
Feel free to surf to my blog post - More Info
Your means of explaining everything in this piece of writing is really good, every one be capable of without difficulty know it, Thanks a lot.
Check out my webpage: website
all the time i used to read smaller content which also clear their motive, and that is also
happening with this article which I am reading here.
My homepage :: corporate gifts Johannesburg
Oh my goodness! Impressive article dude! Thank you, However I am encountering issues with your RSS.
I don't understand why I cannot join it. Is there anybody else having identical RSS issues? Anyone that knows the answer will you kindly respond? Thanks!!
My weblog :: nail products Cheshire
I’m not that much of a online reader to be honest but your sites really
nice, keep it up! I'll go ahead and bookmark your website to come back later on. Cheers
Also visit my web page :: domestic cleaners Midrand
You've made some decent points there. I looked on the web to find out more about the issue and found most people will go along with your views on this site.
My blog :: fireplaces
Hello, i think that i saw you visited my site thus i came to “return the
favor”.I am attempting to find things to enhance my website!
I suppose its ok to use some of your ideas!!
Feel free to visit my site :: recruitment
Exceptional post however , I was wanting to know if you
could write a litte more on this topic? I'd be very thankful if you could elaborate a little bit more. Cheers!
My weblog :: click here
This is very fascinating, You're an excessively professional blogger. I have joined your feed and stay up for in the hunt for more of your wonderful post. Additionally, I've
shared your web site in my social networks
Here is my homepage :: digital signage south africa
Greetings! Very helpful advice in this particular article!
It's the little changes that make the largest changes. Thanks a lot for sharing!
Also visit my weblog: cnc production
My partner and I stumbled over here coming from a different web page and
thought I might check things out. I like what I see so now i'm following you. Look forward to looking over your web page again.
my blog ... bookkeeping
Asking questions are actually nice thing if you are not understanding something
totally, except this paragraph presents nice understanding even.
Here is my blog: specialised cakes
Yesterday, while I was at work, my sister stole my iphone and tested
to see if it can survive a thirty foot drop, just so she can be
a youtube sensation. My iPad is now broken and she has 83 views.
I know this is entirely off topic but I had to share it with
someone!
Also visit my web-site - sign company
Hello would you mind stating which blog platform you're working with? I'm looking
to start my own blog soon but I'm having a tough time deciding between BlogEngine/Wordpress/B2evolution and Drupal. The reason I ask is because your layout seems different then most blogs and I'm looking for something completely unique.
P.S Apologies for getting off-topic but I had to ask!
My web blog :: dating
Wow that was strange. I just wrote an extremely long comment but after I clicked submit my comment didn't show up. Grrrr... well I'm not writing all that over again.
Anyways, just wanted to say wonderful blog!
My webpage: business registration pty and trust
Appreciation to my father who stated to me regarding this blog, this web site is in fact awesome.
My homepage: general building & construction
Woah! I'm really digging the template/theme of this blog. It's
simple, yet effective. A lot of times it's hard to get that "perfect balance" between usability and visual appeal. I must say you have done a excellent job with this. In addition, the blog loads extremely quick for me on Opera. Superb Blog!
Also visit my site; signage Gauteng
It's awesome designed for me to have a site, which is beneficial in favor of my know-how. thanks admin
My blog post :: power steering and brakes
I was wondering if you ever considered changing the page layout of your blog?
Its very well written; I love what youve got to say.
But maybe you could a little more in the way of content so people could connect with
it better. Youve got an awful lot of text for only having 1 or 2 images.
Maybe you could space it out better?
Feel free to visit my homepage: bookkeeping around durban
What's up to all, how is everything, I think every one is getting more from this web page, and your views are nice for new viewers.
Feel free to surf to my web site :: 888 Poker Offer
It`s great idea!!! Thanks a lot for the tutorial!